Monday, 31 December 2012

Finally!


Finally after what seems like ruddy forever I managed to get some gardening done - in between wind and rain storms.
When I say "gardening" what I actually mean and what would be nearer to the truth is that I managed to sow some seeds. Yep, that's the extent of my "gardening" and all 10 mins of it were carried out undercover in the polytunnel.
Hardly enough to call "gardening" I know but those 10 mins felt bloomin good, sowing seeds in the middle of winter somehow makes you believe that Spring may just be around the corner.
So what could I be sowing in the depths of winter?
Well, I was out shopping the other day, one of the few times I actually leave the sanctity of my home and land and once again I passed the Phormium Tenax that are growing like triffids outside a department store so this time instead of promising myself that one day I'll get some of the seeds, I got hubby to wait in the car while I grabbed a few seed pods.
I know nothing about Tenax seeds but I assume these are ready because the pods had actually burst open and the seeds were literally just about clinging on inside.

Once I got em home, I asked a few people over at UK Veg Gardeners if anyone had had success with Tenax seeds (my last attempt years ago produced nothing) and once I had a reply I got to work with them.
Basically I sowed them in damp multipurpose compost, sieved compost over the top of them and then put them in the coldframe to get that period of cold they need.
Once I'm back off my holidays in February I will then give them some bottom heat and see if I get any seedlings - fingers crossed.
I'm seriously hoping that I get a couple of plants from these because I've noticed Tenax does extremely well in the exposed coastal gardens up here.

As seed goes these are really quite pretty methinks.


Don't you just love it when you have an excuse to buy more chocolate tubs - they make super seed trays once you've pierced drainage holes in them.

I'm quite excited about seeing whether these produce anything for me but I have to tone down the excitement a little because I have a tendency to chuck them away if they don't produce in the time I think they should.
So fingers crossed and away from the seed tub - eyes only!


Sharing at:

Tillys Nest

Sunday, 30 December 2012

I need Seaweed.

Healthy soil = healthy plants right? Right!
And a fabulous soil improver that also just happens to be free - Seaweed, available in abundance at your local beach.
Did you know that Seaweed contains over 70 Vitamins, Minerals & Enzymes all ready and waiting to provide those nutrients to plants?
Besides soil conditioning, claims have also been made that seaweed can
  • help reduce plant shock when transplanting, 
  • reduce fruit drop, 
  • help encourage root growth and 
  • enhance photosynthesis by increasing the plants Chlorophyll levels.  
Cool huh!
But how do we utilise seaweed once we've gathered it?
Well there are various ways of tapping into all those nutrients. We can use it as a mulch to rot down slowly into the soil or directly onto the compost heap to rot down but my favourite way is compost tea. It stinks to high heaven and I dread taking the lid of the bucket each time I use it but it's worth it if it's improving my plants and soil for free.
There's always the debate to wash or not to wash and I admit the first time I used seaweed I did wash it but I don't bother anymore.
To make the compost tea I simply stuff some Seaweed in a bucket, fill it with water and leave it somewhere for a couple of weeks to stew. Then I just drain the tea into a spare tub that has a lid and chuck the stewed seaweed onto the compost  heap along with any extra I managed to get. The tea is then used to feed flowers and vegetables at a rate of 2:1 (2 water, 1 tea) though I have used much weaker solutions on some plants.

With seaweed tea in mind I took a trip to the local beach the other day, bags in hand to gather as much as I could. Gutted to find when I got there that the only Seaweed around was live stuff still rooted or attached to rocks. This is the stuff I never ever take, it's just too important to the ocean and ecosystem, I only take stuff that has been washed up.
The ocean was rough while we were there, even the seals were having a hard time to get to the safety of the rocks and apparantly a few of the poor things have also washed up dead at the other local beaches - beaches which are also apparantly abundant in Seaweed. I guess we were just at the right beach at the wrong time.
Never mind we have plenty of beaches to choose from and I'll have that Seaweed tea ready for my veggie crops in 2013.

 
None of this seaweed was any good to me as it's rooted or stuck to rocks.


Rough waters.


My daughter with Kasa & Lucy, safely on leads as the ocean was seriously rough.


Friday, 28 December 2012

Garden therapy & frozen earth.

I bet I'm not the only one who stares out the window on these cold, rainy, windy days eager for the Spring to arrive so that I can get out there to carry out some of the many plans for the garden I have rattling around in my head!
Honestly I have so many new and exciting ideas for next years gardening that if I don't start some of them soon my blinkin head will explode and I'm adding fresh ideas every day because time I would have spent in the garden is now time spent on the laptop reading every gardening article and blog I can find.
Yesterday the wind had dropped to literally nothing and I had planned to forget about housework and spend all day outside on the land with the dogs gardening to my hearts content - garden therapy and I was so looking forward to it.
The problem turned out to be not the wind or rain but frozen earth! Any kind of digging, plant replacement or garden clearing was out of the question and with nothing doing in the Polytunnel or the green house my only job was to replenish the bird table - so much for garden therapy.
I'm sure the birds appreciated the feast I served them up though

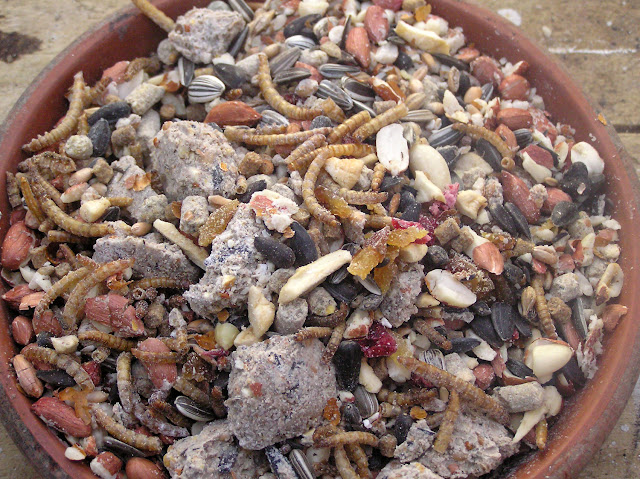
bird food, bird seed
This feast includes crushed fat balls, regular bird seed, crushed peanuts, koi food, mealworms, fat pellets, pinhead oatmeal, fruit and niger seed.

I also make my own lard cakes into half coconut shells that hang up for the birds. I have to be careful what I hang up though cos the Rooks take everything. I've even had to mesh the birdtable so that anything bigger than a Starling can't get in.
I'm in the process of making another birdtable cos this one is way round at the veggie area and we'd like one that is near the house patio doors so that we can watch them from indoors. We mainly get Blue Tits, Coal Tits, Robins, Greenfinches etc to the table but I'm going to add hangers to entice the Waxwings and other birds that I've seen up the lane at someone elses feeders. I just hope it doesn't encourage the Rooks as well.

Coal tit, garden bird


Blue tit, garden bird


Wednesday, 26 December 2012

Are you a planner?

It's THAT time of year for me. The time of year where xmas day is over and as I don't really bother with New Year celebrations I throw myself into garden plans.
I say 'plans' very loosely however because I'm one of those gardeners where 'plans' never make it to paper - they're all stored in my head or occasionally in the form  of images on my computer.
I have never worked from a formal plan which is probably why my gardens are areas scattered over about 1 acre (3 more to use up) and have no flow between them.
It's annoying this no plan gardening but I could not do it any other way.
Don't get me wrong I am an able artist so the drawing wouldn't be an issue but my brain just doesn't work in that manner, I couldn't work from a planned drawing in front of me, I simply wouldn't be able to 'see' it. However I can work from a plan in my head and can imagine the finished look., strange huh!
Transferring that design and image to other helpers can be a bit of a problem though especially as I have a tendency to change things on a whim, but this is just how I work.

So what kind of planner are you?

Would this be your plan of choice? Perfectly proportioned, showing all your desired plants in glorious colour and every slab and stone shown in position?  This would do my head in - too much colour and detail  just distracts and confuses IMO.
I'd end up just sitting and staring at it before giving up!
Gardens Illustrated

Or maybe you prefer B&W?  Have to admit that if I was a planner then this would be my choice. So much easier to see the lines and allows for a bit more alterations than the colour concept.

Garden ideas


Although I prefer the B&W I think this one is more likely to be what I would come up with. I just do not have the patience to sit and design, I'd do as quick a job as possible so that I can get out there and do something completely different

would make sense to no one but myself.


So my garden plans for 2013 are safely stored in my head ready for plenty of tweaking and imagination.
How are your plans going?
 

Sunday, 23 December 2012

The worst is over!

The storm has finally drifted off, it feels as though we have been weathering storm force winds and lashing rains for weeks but in reality it's only been a few days. A few days is plenty enough though and I hope it's the worst over with for a while.
Today I managed to have a good look around outside for the first time, not with the intention of gardening but simply to survey any damage. Suprisingly, other than an uprooted Willow tree, there is no damage from the winds.
The rain however is something else. Most areas have drained well because we have a huge natural pond/mini lake and everything just seeps into there but the new area of raised veg beds we built is kinda swamped..

veg growing, raised veg bed, flood
Pretty icky huh?

Unfortunately this is going to take an age to drain away, if in fact it does at all because the pond level now seems to be the same height.
We're going to have to put our thinking caps on cos this is no good for accessing those veg beds.
Still compared to some of the flooding that is going on at home in England we have been amazingly lucky to get just this so I'm not complaining.

So I had a little suprise while I was scouring the garden today.
Look what I found that I never planted

Cordyline, garden, garden plant

Now to me it looks like a Cordyline? But I'm kinda shocked it has self seeded itself here because Cordylines need protection in the winter in my garden.
I first saw it last winter when it was just a tiddler and it seems to have grown to this size over the summer hidden in Montbretia and Day Lily foliage. Now that foliage has died back it has revealed this plant again.
I was going to dig it up and move it but hey, who am I to mess with mother nature! If this is where it likes to plant its feet and thrives then this is where I'll leave it!
It is a Cordyline though, right?
 

Saturday, 22 December 2012

It's Permanent!

Yup I've finally found it!
A permanent marker that is actually permanent!
Doesn't it just annoy you when you buy permanent markers to label all you garden plants and seeds or seedlings only to find that after a few weeks there is nothing left but an indecipherable black smudge? It annoys the heck out of me and so after putting up with it for quite long enough I decided to research reviews on permanent markers and give it one last try.
My new choice of permanent marker? 

Molotow one4all range
"The ONE4ALL high solid paint marker series is as unique as versatile. It consists of technologically sophisticated markers in six sizes (1 mm - 15 mm) and a unique acrylic-based hybrid-paint that works on almost every surface. All markers are refillable with ONE4ALL refills and the tips can be exchanged easily. The paint itself can be used with every application tool imaginable. Due to its versatility ONE4ALL opens up endless creative possibilities for artists, writers and streetartists. This marker and paint system is the missing link between spray can, airbrush, marker and paint brush. A highly pigmented multi-talent "Made in Germany" that convinces with an unprecedented color brilliance and opacity – a paint that's capable of everything and covers everything".


I could not be without this marker now (go for the fine nib) it really does do as it claims and the labels that have been left outside for months are as clear and decipherable as the day I wrote them, even on the Milk carton labels I made that nothing else appeared to adhere to.
Plus with so many different colours available you can be as adventurous as you like!
So if you are on the look out for a good permanent marker for your gardening needs, that does the job it claims to do, Molotow is the way to go!


Friday, 21 December 2012

Weather the storm!

"If you want to see the sunshine, you have to weather the storm" - Frank Lane

This is why I haven't ventured out for a couple of days

storm, harbour, stormy weather, sea, ocean

That is the North Sea Coast in Wick town obliterating the Sea wall, flooding the streets and by the looks of things demolishing 2 'Simpsons' lorries.
Luckily although Wick is the nearest town to us it's 15 miles away and although we live close to the sea there is a couple of fields between us and it followed by a cliff of about 100ft - we're relatively safe!
Today however I have to venture out into Wick because I have the car booked in to replace all 4 tyres which currently are bordering on illegal - I should be more vigilent in checking these things but luckily the local mechanic spotted it while the car had a bulb changed.
Anyways I will have my camera at the ready for whatever happens to...........well.........happen!


So today I decided to check out what hardiness zone we are in here in Caithness. I've never actually bothered with arming myself with such information simply because I wouldn't know what to do with it and I'm the type of gardener that plants whatever I want and hopes it survives.
BUT I've had  a couple of people ask me what the hardiness zone is here and rather than continue to admit I haven't a clue I decided to do the real gardener thing and check it out.
So according to this we are zone 8:-


So now I know our hardiness zone but I'm still none the wiser as to what this actually means or what I'm supposed to do with the information. I suspect I'm going to have to do some research on the matter - it doesn't do to know half of something does it!


Thursday, 20 December 2012

Thinking of a polytunnel?

The weather here right now is nothing short of atrocious! Storms are brewing behind storms that are already lashing the coast and my garden is taking a real beating. Thankfully from what I have managed to see by craning my head round the bedroom window it would appear that my polytunnel is still up and intact.
As we are quite exposed here purchasing a polytunnel was a bit of  a gamble, we've seen many of them shredded by coastal winds up and down the county.
To improve the chances of your tunnel surviving in exposed areas there are a few precautions you can take:-

* Keep hoops at 5ft spacings instead of 6ft.
* Double ridge bars to each side instead of one central bar.
* Crop bars attached to all but the first and last hoop will add strength.
* Take time to embed the base plate properly. We chose the type that gets buried into the earth instead of plates that are bolted into a concrete base. This obviously depends on whether you intend to site the tunnel on concrete or earth.

I'm convinced that all those things are what has kept our tunnel in place despite us being quite exposed and right next to the coast.
There are a couple of things I would do differently though:-

* I bought Visqueen Luminance polythene as it helps reduce dripping in the tunnel but I'm convinced it's opaqueness prevents as much sunlight getting in as a clear polythene would allow and therefore affects crops such as Tomatoes that need lots of sunlight. I would change this next time.
* We bought the Aluminium base rails because we thought it would be longer lasting than wood however it was an absolute pig to install and resulted in splitting the polythene. We did complain about this and recieved new polythene from the company but when we recover the tunnel we'll change to a wood system.
* Sliding doors seemed like a good idea however the doors only come with one bolt per door that goes into the ground and it's just not enough to hold it in strong winds (I've lost the doors a couple of times which resulted in bent door runners). I still prefer the sliding door system but I would advise buying an extra floor bolt per door.

I was reading a blog the other day (sorry I forget which) that inspired me to get outside when I couldn't garden and do the dreaded task of clearing and tidying the polytunnel ready for a clean start in the new year.
I didn't take any before photos because....well....I was just too embarrassed but I was a good girl and got some afters:-


polytunnel, gardening
Wow, look at the floor space now.


 polytunnel gardening
After emptying garden pots they're all lined up ready for washing. The contents of them are overwintering in the middle bed.

polytunnel growing
May still look messy but it's organised mess lol.

Lavender
Overwintering Lavender that my daughter rescued from a department store skip!


This polytunnel has been a real godsend for overwintering the more tender plants, my much smaller greenhouse used to be packed to the rafters in the winter with them. Said greenhouse (a diy version that is wooden at the bottom with double glazing to the top) is now my workshop which means I don't have to take up space in my husbands shed anymore!

Next year these beds will be filled with Cucumber, Garlic, Tomato, Sweetcorn, Courgette, Onion, Salad crops, Strawberries and hopefully - fingers crossed - Melon.
We also have Apple, Pear and Plum trees in there which provide a decent crop.
The outside beds which we've increased in number will hold Peas, Beans, Onion, Cauli, Cabbage, Carrots and probably a load of other stuff that has no chance of growing here but will be thrown in by husband who is apparantly going to "help" this year despite not having a clue what he's doing or how to do it!


Tuesday, 18 December 2012

Recycled:- Space saver/pot holder

I originally posted this tutorial on my craft blog - Coach House Crafting.

The weather here in the Highlands is a tad naff at the moment. It's either wet, windy or the ground is too frozen to be worked.
So what do us tenacious gardeners do when we can't garden? We build!
This is a project I completed a couple of years ago with the intention of making some form of space saver that meant I could use some of the vertical space in my greenhouse (no polytunnel back then) for pots of young veggie seedlings.
This is what I came up with:-

garden spacesaver, pot holder, recycled garden


It really does do the job I intended it for and it cost me nothing more than scrap wood I already had, plastic milk cartons I saved for the project and half a day of my time.
So simple to make and yet a great workhorse - don't you just find that the most simplest of items are the ones we find invaluable? This little tool is in work throughout the year, every year!
Here's how I made it.

First you should gather all your tools and materials - I never do this because I make stuff up as I go along and never really know what I'll need until I need it but I'm gradually accepting the fact that preparation would save me a lot of time and frustration.
But basically you'll need:-

  • Scrap wood. I used roofing batten for the frame and lath for the pot supports.
  • Electric screwdriver or hammer.
  • Screws or nails.
  • Tape measure.
  • Hand saw or electric cutter.
  • Plastic milk cartons. I used 4 pinters or 6 pinters, the kind with a handle.
First off make a frame from your batten, screw it together and then add corner supports. (I didn't have a particular size in mind, I make these things up as I go along - that's just how I roll)

recycled milk cartons, garden space saver, garden pot holder


Next we need to give the frame some feet for support. I used batten and 3 x2" scrapwood. Once you have the feet cut simply screw or nail them to the base of your frame, like this:-

 garden spacesaver, recycled wood, thrifty garden, milk carton recycled

 
You can see in the above photo how I screwed the batten to the frame first and then screwed the 3 x 2 into the batten, I found this double feet system gave it more stability.

Next I made the rectangle pieces of wood that will hold the carton supports.
For this I used scrap ply and cut 6 rectangles (3 for each side), each rectangle then had a groove cut out of each end deep enough for the carton supports to fit into.
Like this:-
recycled milk carton, scrap wood pot holder, garden space saver

3 of these supports were then attached to the inside of each side of the frame. I didn't make any accurate measurements for the placement of the rectangles I just went by eye.
It should then look like this:-

Next I made the carton supprts and I used scrap lath for this. I cut 6 lengths (3 for each side) slightly longer than the actual width of the frame and then simply slotted them into the grooves of the rectangles we just attached.

Finally give the whole thing a protective coat of something - I used Cuprinol 'Garden Shades' and leave to dry.
While it's drying you can gather together your milk cartons, cut each one all the way around just below the handle (we need that handle intact with the top half of the carton) and simply slot each handle through one of the carton supports.
Your space saver is now ready for you to either fill with pots or to plant directly into the milk cartons (the screw cap can be taken off each carton as needed to aid drainage).


garden space saver, scrap wood garden pot holder


I hope this little idea and tutorial is of some use to other thrifty
 87AWZQ5PHKWM


Linked to:-
Ginger snap crafts
Lil Luna
Bear rabbit Bear 
Tilly's Nest 

Monday, 17 December 2012

The mess that is.......

My Polytunnel!

I'm fortunate enough to have a a rather large Polytunnel - 45ft x 14ft to be exact - and while it has helped me grow veggies and plants I would otherwise be unable to, the outside area kinda sucks if I'm being honest.
It's a mish mash of areas, some that were made before the polytunnel was even an idea and others since it's been erected and although each area does the job it was designed for none of them flow together and it's bugging me - big time!


polytunnel
Nothing doing here but I have plans afoot!


This bare land is going to have a Willow fence all the way round. I know Willow doesn't make the best of hedges but this area gets so boggy and I'm hoping the Willow will help a little - they'll thrive if nothing else! I'm also going to plant them in 2's and weave them into a diamond pattern to help with support so they don't just lean to the prevailing winds.
Something like this:-

Picture from Salix Willows Blogspot


The area will also then house a 3 bay compost bin that I'll be building myself and a cold frame that I'll also be making myself.   


polytunnel, veg growing
New recycled sleeper veg beds. These are extra deep as the ground was dug out about 1ft before filling in.


That area is harder to plan because it gets saturated and because it is smack next to a huge pond/mini lake the ground gets covered in Horsetail weed that is simply impossible to control. It wont be long before the stuff is coming up through those beds just as it is in the polytunnel beds - ruddy stuff.
I'm going to have to make some kind of raised walkway so that I can access the area in the winter without needing waders.


Other side of the polytunnel - bleh!


This is the other side of the Polytunnel and leads up to that bare patch of ground in the first photo. I've edged it with Hebe cuttings I took and once they're grown it will provide a lovely hedge, assuming of course they don't like it there too much and grow like triffids like their parent plant has!
This whole area is smothered in coarse Marsh grass and prickly gorse bush, there is very little real grass. Next year I will grass seed the area and hope the mowing will control the Marsh grass, the Gorse and maybe some of the Horsetail.


Saturday, 15 December 2012

The start!

My first post of my new Gardening blog - how exciting!
I guess I should spend this time to fill y'all in on my style of gardening and the conditions I attempt to garden in - without boring you guys too much.
So, my garden consists of almost 4 acres, waaaay too much space for one gardener no matter how enthusiastic. My husband does try to help me but he's a self employed builder who is finishing the building of our new home so doesn't get so much time.
At the moment my garden consists of 4 areas that in no way flow from one to the other but instead are dotted about in various areas, each being made as a need arose.
We have the back garden which is just getting renovated now,  a greenhouse area with outdoor veg beds, a polytunnel with new outdoor beg beds and a huge pond area. 2013 will hopefully be the year that sees drastic structural and aesthetic improvements to those areas and, fingers crossed, a flow through at least 3 of the areas.  
Gardening here in the Scottish Highlands has been very demanding and has forced me into a completely different way of gardening. Alot of my favourite plants that would have flourished in my English garden simply will not even entertain some of the harsh conditions we have here. We live in the very far north with all it's windy, unpredictable weather and are a few acres from the North Sea Coast. With no near neighbours as such we are extremely exposed!
Despite the pretty naff conditions I still like to grow plants that are borderline hardy for this area and have had decent success, as in all areas of the country some plants do better than others  and I think I will be having to make some harsh decisions in the coming year with regards to some of my favourite plants that while they are clinging to life are hardly flourishing!
The veg garden and polytunnel will be filled with both the old faithful, easy to grow veggies and some new ones that I've never dared to grow before - it will certainly be interesting.
My gardening style revolves around recycling everything and anything, I am too tight fisted to buy what can be made. I build my own planters, composters (barrel style as well as traditional - tutorials to follow :) and pretty much anything else I decide I want or need.

So I shall leave you with a quick glimpse of my garden.

How apt for this time of year! 


These Lilies flourished in my Polytunnel this year and looked fab with the sweetpea. (this is my image but is watermarked for my craft blog).

Waterlily that suprisingly flourishes on the pond alongside 4 others.