Showing posts with label Projects. Show all posts

Tuesday, 4 August 2015

Octagonal pergola and lazy people

This weather continues to astound me. It's now the height of summer and yet I not only needed to wear a thick fleece when I was mowing the lawn on the ride on but I had to have the hood up and tied tightly to keep it there! I have never known summer to be so naff in the 12 years I've lived here - I understand the North East of Scotland is never going to be tropical but seriously, it feels like Autumn right now.
The garden has taken a serious battering and has been neglected for a while now because I've been getting on with building projects instead - weeds can wait lol.

I decided I wanted to build a gazebo as a walk through where the formal part of the garden meets what will be the new unformal part of the garden (once I've done it) but it couldn't be any old gazebo. Me being me I decided to go for an octagonal one and me being me again decided I could mash it together without plans.
The first few attempts were diabolical - I built the panels in the workshop (and even made a mistake on those that still exists because I'm too lazy to change it) and then formed the structure in situ. The problem is I'm one of those people where if there's a quick way and a right way I'll choose the quick way and every time I do that something goes wrong - as it did here.
I just could not get the angles right and couldn't figure out how to do it. In the end I sucked it up and asked Mr TG what I needed to do to get the angles correct, unfortunately this meant doing the job the long slow way and required me to build a square frame and work measurements out - booooooooring!
I have to admit though that the structure went up much quicker and easier once I had the frame to go by and used scaffold poles to hold things in place instead of attempting to hold everything level and drill at the same time - yes, that it how lazy I am.

 Stage 1 - after several attempts at getting these level upright I had a tantrum, pulled them out the ground (even though I had blisters on my hand from digging holes for the spikes) and threw them on the ground. Yes, I had a paddy!! and there they stayed for a few days.


Stage 2 - Mr TG told me how to get the angles correct and how to keep them level while I worked on the structure.


Most of it's up here. It's not perfect but then neither am I so who cares!!
Do you see the mistake on the panels I mentioned earlier? I must have measured 2 of them from one end when putting the cross sections in and two from the other end because two of them have an extra piece at the top - two don't lol.


The tedious job of painting it. I also weeded the bed to the right and planted Bamboo and a climbing rose. The rose is tied to the vertical wires I added to the side gaps as an afterthought.
The bed to the left is in dire need of weeding but it will have to wait.


Gras mowed makes a huge difference. I also completed the base inside the gazebo. It involved loads of cement and plenty of mess - those bricks and shingle are going nowhere!
The bricks sit just proud of the lawn on this side because the ground is lower here and I used the other side as a reference for height. The bricks are level but I will be adding a small step this side so there'll be no tripping over bricks.


I bought the compass slab a few years ago and have never used it until now. Mr TG set it in concrete for me but I didn't realise until it was done that he has the North pointing the wrong way. I did give him instructions as to where it needed to be - everyone here knows the sea is directly south lol- so the North should have pointed just before where the East currently is. Mr TG did offer to rectify it but tbh I like the quirkiness to it now and it's typical of all my projects - there's always something not quite right lol. I like it!


Saturday, 30 May 2015

Garden DIY projects

I'm one of 'those' gardeners that despite having what seems like a hundred unfinished projects on the go I am always on the look out for inspiration for more to do. As a consequence of this I am adicted to 'Pinterest' and sadly can admit to spending a ridiculous amount of time on it most evenings.
The weather here has prevented any kind of gardening for some time now, I can't even mow the lawns as it's too wet and on the days when it's just cold rather than rainy it's just too windy to get motivated.
This has given me time to add to my growing 'Pinterest' folders and I thought that as I have nothing to show from my own garden right now I would post some wonderful garden projects that are cheap and easy to do - I'm all for cheap (preferably free) and easy.

I found these concrete globes on 'the garden glove' along with a fabulous tutorial with 4 different recipes depending on the finished look you prefer. For me it would have to be the pure cement one for 2 reasons - 1) Cheaper - I'm not into buying ingredients if I can help it and 2) I think it would lend itself to spray paint alot nicer than the others.


I came across this next project on 'Creek Tree USA' and they describe these as ceramic hummingbird feeders, obviously I would have no need for that here (though maybe Bee or Butterfly feeders) but I thought they would make the cutest plant supports with very little cost or time.
Pretty door knobs are selling for a couple of pounds for a set of 4 in many of the cheaper stores (none of which I have here) and the right gauge wire would only cost a few pounds too. It would be very easy to attach the wire to the door knobs and voila - no more poked eyes.


Hopefully this year we will be building new pillars at the top gate and I have always wanted to add a Narnia style lamp to the side of them. I did some research on the lamps though and to get the exact one I wanted I wasn't going to get much change from £400, plus the cost of then running electrics up to it. I turned to Pinterest to find an alternative.
This guy, Mark, has come up with the answer for me and I'll definitely be doing it. He's constructed a Narnia style lamp from wood and best of all he's included a solar light to the top so no need for wiring. It may not be the exact style I was looking for but it can easily be adapted to what I want and the guy has even done a video tutoral on it. Check it out on 'Mark's DIY solar lamp post'.

This next project is so simple and obvious yet I never would have thought of it in a million years. I'm always thinking that I wish decking was a bit more comfortable underfoot so I could go outside barefoot in summer, obviously a rug isn't going to last too long out there and will only end up smushy and horrible. Not now!
Laura from 'Design share' has given us a fab tutorial on how to turn a tablecloth into a waterproof patio / decking rug - imagine all the wonderful colour and pattern choices available. This is a definite project for me this year.


I have no lighting in my garden currently - I must be one of the few people who just hasn't got round to it - and so I'd like to start adding a few pieces especially around the patio seating areas. I'm not really into buying the ones on stakes though because I can get a bit OCD about them being perfectly upright but I found this great idea (one of many on Pinterest), unfortunately I cannot find an original link to who created it but the photo speaks for itself - vases, stones and solar lights.


Again I cannot find a direct link to the creator of this next one but I like it so much I wanted to include it. It really is a simple idea and seeing as I have all the ingredients to put it together I will definitely be doing this to add some attraction to my garden. I'm not sure how to do the knot but I'm sure a google search will be productive.


I have plenty of wood scraps laying around, usually I put them in the log shed for winter fuel but now I have seen these I think my garden will instead be plastered with scrap wood animals. I'm not sure whether I want a moose but definitely dogs, horses, hens etc.
'Painted Therapy' provides a good tutorial using a Silhouette Cameo but I think I'd prefer to freehand draw.


Tuesday, 30 July 2013

Garden projects and another plant ID

Yesterday was my first  day of doing anything resembling 'real' gardening since popping a disc in my back, I'm not fully recovered but I think I did pretty darned well to hold back for 3 weeks so I thought 'why not give it a go'.
I'll admit I could have started with something less taxing on the back than shifting slabs and heavy pots (I never learn) and yes my back is sore today but I don't care, I had a blast!

It took me pretty much all day to complete 2 small jobs but hey ho I got there in the end. The first job was to replace this scaffold board walkway at the pond with something a tad better looking, obviously this involved plentiful weeding too but it's certainly improved it.
This is the before  (look at all those weeds - eek!)


And after - excuse all the mud/stone/weed right at the back, that whole area is going to be decked ........ eventually!


Next job was to pot up a climbing Fuchsia 'Mrs Boothby' and provide some kind of trellis for her to cling to. Originally I came up with this first trellis simply because it was lightweight and meant less bending etc for me


but I thought it look blah and that the Fuchsia would soon outgrown the trellis so I changed it. Whatever I put there has to be moveable until Mr TG has finished the Harling to the external walls and all I could find big enough and moveable was this


At first I liked it but the more I looked at it the less I liked the colour, the creamy first one looked much better against the wall and suited the plant better so I'm either going to spray this one ream (it's a metal bed frame incidentally) or I'm going to build a brand new one and paint it the cream I use all over the garden - 'Cuprinol garden shades - Old stone (I think)'.
I've hankered after a climbing Fuchsia for a while and I love it, obviously it will need protecting in the winter so will go in the poly tunnel but I can't wait to see how it performs next year - I may even attempt cuttings.

I have this lovely yellow plant flowering in the garden this year. I remember planting it last year but assumed it had died over winter, for the life of me I cannot remember the name of it - any ideas? I think it began with an 'S' but I could be wrong.


I'm supposed to be taking it easy today, supposed to be making a start on Christmas cards and I was happy to do that when the weather man claimed we'd have rain all day today, but there's no sign of rain and I want to make an outdoor potting bench - what to do, what to do!

Sunday, 9 June 2013

Garden overhaul

The Cauli's and Cabbages planted in the polytunnel are still getting eaten by slugs (I haven't got around to putting down cardboard yet) so I was quite surprised to find that the ones outside in the raised bed haven't been touched at all.
I do keep them covered with fleece to keep the butterflys off them but surely that wouldn't deter slugs?


Here's a glimpse of the extra land to the side of the house that we're thinking of adding to the existing garden. There's as much of it as I need but as you can see it needs a whole lot of work and extends way out to the right and far behind me.


That ground is about 3ft deep of hardcore so any planting would have to be in raised beds, grass would be viable if we lay a good layer of top soil first.
The back fence does have a line of Willow trees, these are usually shallow rooted and don't last very long in our winds so we dug out a trench all the way along the fence first approx 3 ft deep to the soil below. The 6ft willow were then planted into that and the trenches filled in with soil, this means that at least 3ft of the trees are underground and should therefore stay upright.
Still that's gonna be a lot of work if we go ahead.

Remember when I said in my last post that Mr TG and I were discussing what water feature to add in the pond? Well I was thinking along the lines of this

http://www.retaildisplaysandprops.com/custom_nature-themed_environments.htm

Ok more realistically this

http://www.waterfeatures.co.uk/nh.html
Basically I would have liked us to build something where the water runs off slate.
Today though I left Mr TG to his own devices and I thought he was working on "his" patch of land that he's been clearing but nope he'd been erecting this


Excuse the foreground mess it's waiting for decking to be erected but that piddly fountain is everything I hate about garden water features. Some people can make them look great but the wind we get here makes that kind of 3 tier fountain pretty pointless.
I'm currently convincing Mr TG that we need to collect some of the humongous rocks we have and make it look nicer than just an oblong with rocks round it - hard work though, bless him he thinks a water feature is a water feature is a water feature so it could take some time.

With the first half of the garden requiring only minimal work now - mainly decking - I can get onto to the second half once the dogs have their own area finished.
This is the current state of some of the bit to do


It's full of weed and it's been made worse by the fabric we put down under the gravel. The weeds had no problem growing through it and even self seeded in the gravel itself, this image only shows the grass weed but honestly, it's a mess.
All the Pink and Blue is Aquilegia, one plant that self seeded over and over again and is now more of a weed than a plant - but it's a pretty weed so it gets to survive one more year.
There are some nice plants in there such as a Rhodi, Hosta, a hardy Fuchsia, Dogwood, Cranesbill etc but I'm looking forward to getting to grips with this second half later in the year.

Saturday, 8 June 2013

Willow water and unknown pond bugs.

I am determined that this final attempt at Fuchsia cuttings will work. After my last attempt following the advice in my age old Fuchsia book I appear to have lost most of the cuttings - I may be lucky and have about 40% alive.
So this attempt is something I've never tried with Fuchsia cuttings though I do it with Hebe cuttings all the time - plonking the little blighters in water.
To add a little twist I added tiny willow cuttings to one of the pots of water, I've read on the internet that Willow naturally contains a plant hormone that stimulates root growth (which is why willow is so easy to root in a bucket of water) and this hormone is leached in to the water when actively growing willow is cut up and soaked in water. So that's what I did with one of the containers - I added cut up willow to the water and made a lid that enabled me to poke the cutting through to the water below but keep the leaves free of it.

Willow added to the water.


Ingenious lid (cough) that keeps the cuttings safe.

I know I haven't labelled the cuttings but tbh I've taken them so many times (with nothing to show for it) that I pretty much know them by leaf type, so in that pic I have 'Hawkshead', 'Paula Jane' & an unknown trailing variety. I also took some 'Ellebel' and a hardy unnamed one that I've had for a few years (actually one of the few I've managed to grow from a cutting).
I also took some of the cuttings and put them in a pot of plain water plus I stuck some straight into compost - none of them are in the heated propagator this time, I've put them in unheated ones in a shaded area of the polytunnel (I'm much more likely to keep a good eye on them that way).
Now I just have to wait and see.

I just had to take a photo of this Londons Pride. I've only ever really glanced at the flowers, just assumed they were pretty white dainty spray like flowers, nice but meh!
Then for some reason I actually decided to look at them properly, have you ever had a good look at them? They are quite simply the most dainty, pretty, painted like flowers I've seen in ages


Aren't they just so pretty!

Now I'm wondering if any of you pond lovers can shed any light on this bug? It's teeny weeny and stays on the top of the pond. They zoom round like bugs on speed and never ever stop, we've never seen them eat anything or anything eat them but there's loads of them.

Please excuse Mr TGs typical builder finger lol.
Mr TG finally has some fish in his pond. I've transferred a few plants from the main pond - Marsh Marigold, Water mint and a Lily that I have a feeling may be too big for it. Mr TG then added some kind of weed that I have no clue what it is and what it's actually going to do. Mr TG put it in there so he can be responsible for whatever it does!

I've just started finishing the end of the pond. I wanted to make a beach effect with us living by the coast and this is by no means finished.


The container to the right has a Gunnera planted in it so that should grow really large - the ones by the main pond are anyways.
The pebbles are from the garden and the local beach and I was aiming for the Saxifrage to look as though it had spilled out of the urn so we'll see what happens once it's actually started to grow.
The pond is due a water fountain but there's debate about what it's going to be - I don't really fancy a fountain in the middle of the pond, I'd rather have some kind of stream trickling down the side. The jury is out on it (our likes are very different) but one day I'll show you the very large formal 4 tiered water feature Mr TG dragged (it was concrete) into the middle of our natural, odd shaped mini lake - it looks odd to say the least!

Saturday, 25 May 2013

How not to build a pergola!

I have just wasted almost an entire day in the garden.
I know what you're thinking - how can a day in the garden be a waste? Well when you spend 6 hours attempting to build a pergola and at the end of the 6 hours you are no further along than when you started, it's pretty much a waste.
I've had this thought of building a pergola for ages but me being me running true to form I got going without a plan or even a plan of a plan.
The first section went well enough, I hand sawed all the rebates and really took my time doing it, then I decided the next section would be quicker if I got the jigsaw out.
I was wrong, so so wrong!
The jigsaw didn't seem able to make cuts as precise and tidy as my own hand cutting (yes I know I'm blaming the tool not myself) and I should have walked away from the project at that point but I didn't.
The whole episode was a palaver from start to finish and it turned out that the pergola was never going to sit where I wanted it to or even sit square because I had got my initial dimensions wrong - I discovered this important fact after I had secured the darned thing with 6" nails.
I even wasted about an hour trying to lose a huge massive bolt that was sticking out of the sleeper that I wanted to rest the pergola against - I used a chisel to cut away the wood around the bolt so that I could hammer the bolt flush with the sleeper (no way can you physically remove these uber bolts and I was too impatient to wait for Mr TG to grind it off for me), I can still feel the vibration up my arm as I hammered and hammered that ruddy thing.
The real insult to injury came when the pergola wouldn't sit against the sleeper anyway cos I'd built it all wrong - what a complete waste of time and all my own fault.

You can imagine the sarcastic glee from Mr TG can't you

"I take it you hammered it with a heavy lump hammer and not your average hammer?"
How do I answer that without looking a complete moron? I couldn't, so I didn't, I just stared at him.
"I take it you also added some supporting braces to it to keep it upright and square"
Again, I just stared whilst secretly cringing at the wibbly wobbly structure I'd lost my temper with.
"I take it you secured it temporarily with small nails? I know you, you'll use 6" nails given half a chance and you'll never get them back out"
Oh you know me so well Mr TG.
"Did you take before and after pictures for your blog? Oh wait, you could just use the before picture twice couldn't you!"
Oh Mr TG you are so droll - now let's go look at your pond!
"Want me to help you?" (in that I'll do you a favour tone)
Nope, I'll manage just fine Mr TG. The one time I actually want something built with a frikin spirit level and I can't let him help me cos I'll never hear the end of it.
Tomorrow that soddin pergola will be up!

I did capture some pictures of the view as I thought over my problems today though


Shame they're a weed actually cos they smelled pretty lovely!


Yep, my thinking state involved alot of laying on my back but what a pretty sight especially once all the clouds disappeared.

I also found myself thinking we may just have the dirtiest, smelliest Shih Tzu in need of a summer clip this side of Caithness. I may clip her off tomorrow but it's not a pleasant experince as this little girl spends most of her day rolling in every kind of animal excrement she can find.
The first picture is one I took while telling her she was cute and gorgeous (to get her to cooperate), the second one is what she did the minute I'd taken her picture


All was not lost in the garden though. last night I did manage to get a few flowers out of my polytunnel and into a container


That container is bigger than it looks and now it's full of soil and plants it weighs ALOT. Shame we have to move it as Mr TG needs to get the harling done to the house and we've decided to put a raised verandah right on that area!
One day I will think things through properly!


http://www.blogdash.com/full_profile/?claim_code=8d0147261f7a092e94e34e7699df5b53

Saturday, 27 April 2013

Manure and worms, what could be better!

I have decided to stop whinging about the weather! I've come to the conclusion that it is what it is, I have no control over it so  I just need to work with it.
What made me come to that conclusion? Well, yet again today I watched the weather forecast on TV and planned my day accordingly. It wasn't supposed to be terribly warm today but we were assured of a dry day with a little breeze, this means conditions would be perfect for me to get out and dig some more of that clay soil over after last nights downpour. With the washing loaded onto the line outside I donned the boots and got ready. As soon as I got outside the heavens opened and we got hit with hail stones! I sheltered in the greenhouse and fed the birds while I waited for it to pass and waited and waited and waited. Looks like today is cold, windy and chucking hail stones at us - I give up caring!

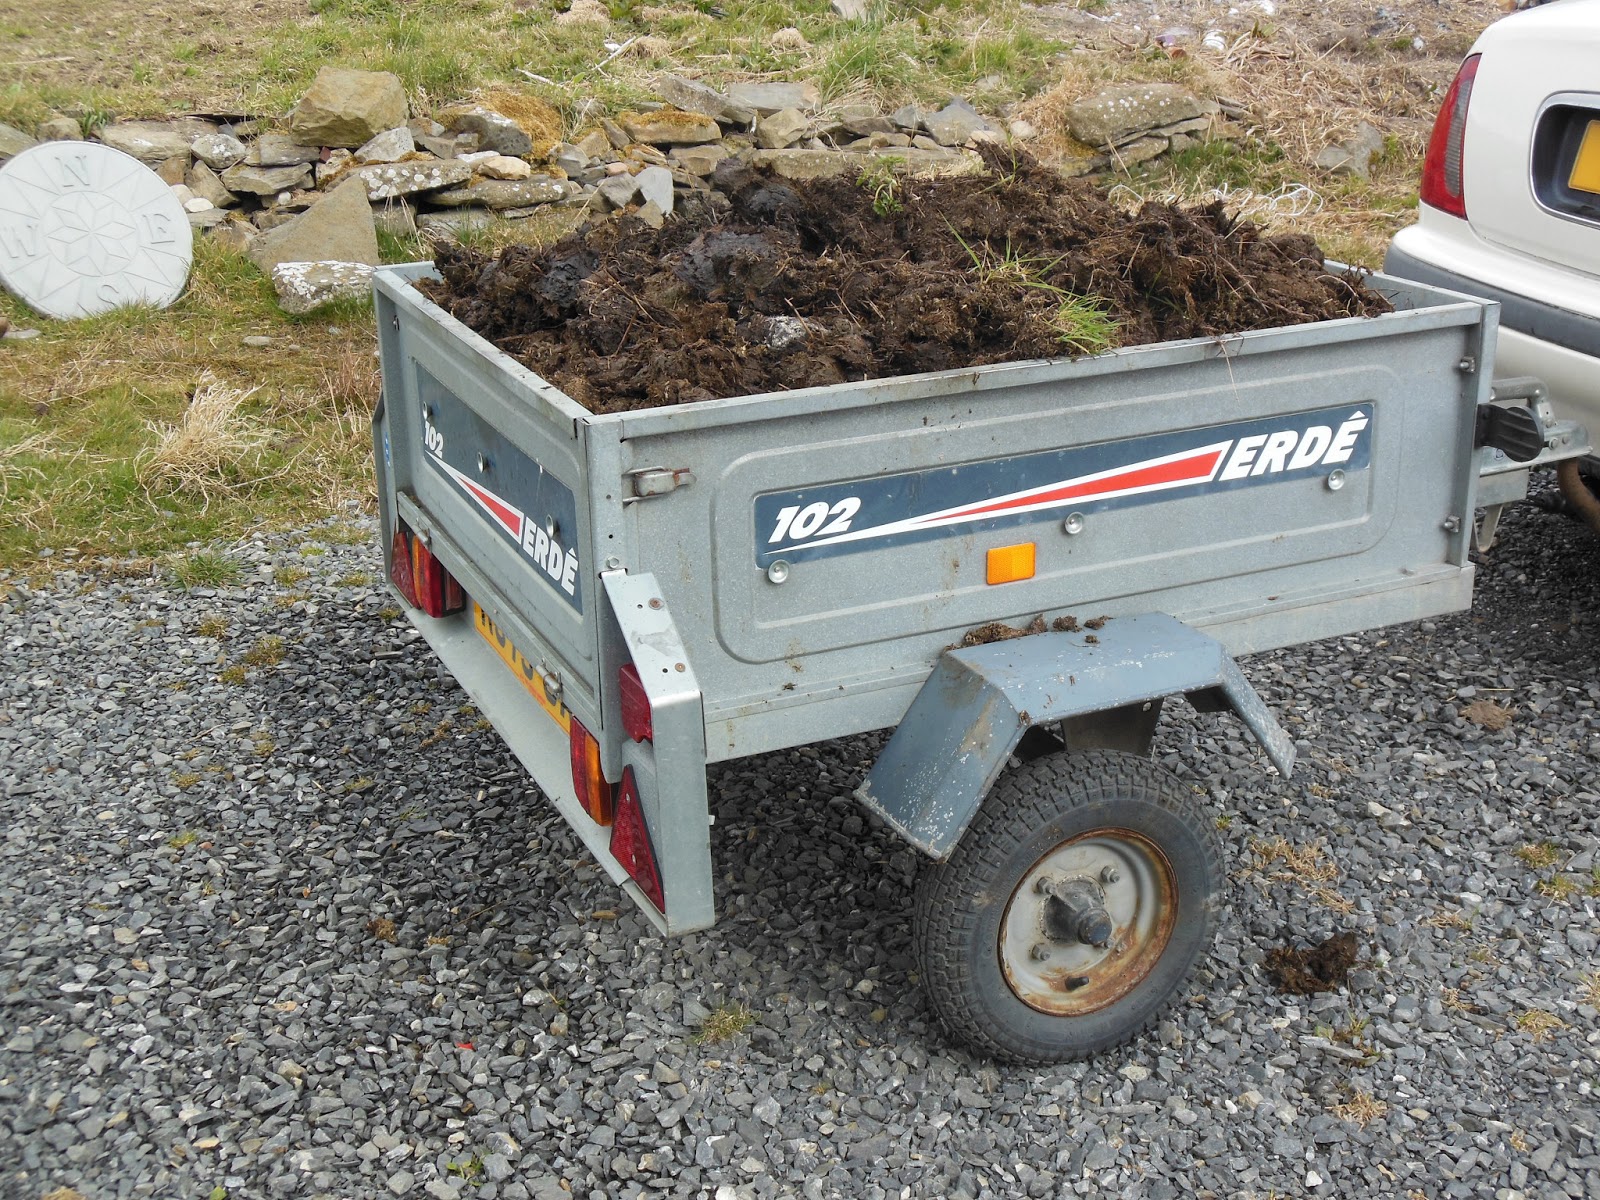
Anyways yesterday (another day similar to today) I got my daughter out of her pit at 6am to come running with me (didn't go down too well) and after our brisk exercise I roped her into coming with me to get a trailer load of manure - yes, I finally get some of those worms.


One trailer load of that went nowhere so today Mr TG roped in my daughter and her boyfriend (at 7am lmao) and we took his 14ft trailer and filled it to the gunnels with manure, should be enough for quite a while and as an added surprise I'm pulling out all sorts of bulbs from it at the moment, mainly Daffs and Tulips but it's gonna be exciting to see them next year.
The manure is extremely well rotted as it's been in a heap for a few years so I delved in with gloved hands and started pulling out those worms. To be honest I haven't a clue what makes one worm different from another but apparently the common garden worm is no good because it can't stand the conditions of a wormery - I needed specific worms. So assuming the worms found in that muck are the correct worms I got my wormery going.
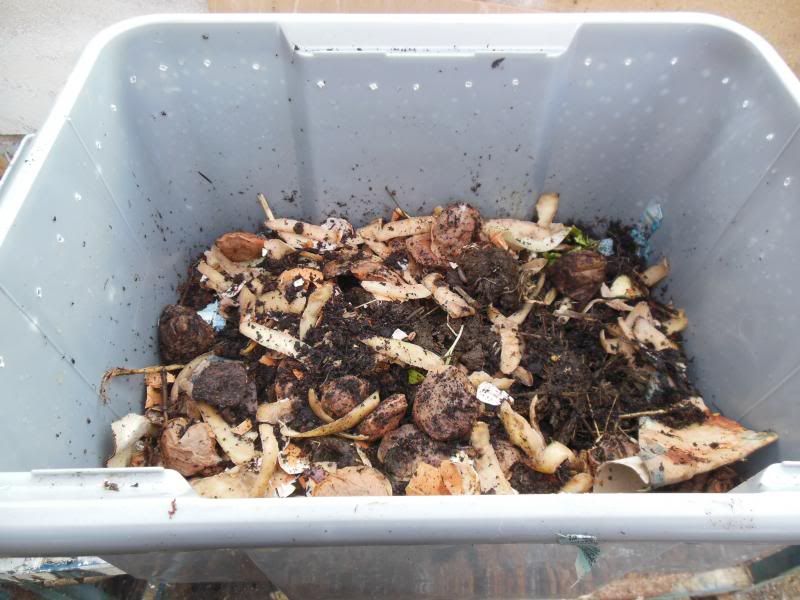
I've read many wormery articles on the net and all the different advice got mushed up in my already mushed up brain so I figured I'll do what I think is right and I'll soon learn if it's not. With that in mind I lay damp cardboard on the bottom of the middle bin, added damp shredded paper followed by a little garden compost then the worms then some kitchen scraps and finally damp cardboard to keep the little critters underneath and working away all topped off with the lid.
Here's the inside before the cardboard top layer


I'll let you know how it goes.

Onto a more exciting note the Silkie hen is sitting on eggs for the first time this year. Silkies make fabulous brooders and it's all this one seems to want to do. We've had a few chicks hatch but because we've left the rearing to the hen only 2 have survived past a few days old and even those 2 came close to death once. This time we'll let her sit on them and hatch them but then we'll take them and rear them.
Silkies really don't have much interest to me because they're more a pretty bird than anything else and their eggs are pretty pathetic, but we'll sell the chicks once they're old enough and then next time she gets broody I'm going to swap her eggs for some of the laying hens eggs and see if she's successful at hatching them. Granted the chicks will have a Silkie father but I'm hoping that's as far as the resemblance goes - I have no idea about these things.


She will not move off those eggs for anything!


Friday, 19 April 2013

A....erm....pallet wood monstrosity.....

Today I built the perfect example of everything Mr TG hates and loathes about a DIYer getting their mitts on pallets - the pallet fence!
I hear your cries that pallets make excellent fencing and I myself agree, however NOT the way I built one.
I'm not the most patient of people I'll admit and as I often say I don't work from a plan either so alot of my projects are doomed from the start. However I had put a little thought into this one, well as far as deciding what I was going to make the fence with anyway, the fact that I didn't have anywhere near enough windbreak netting put plan a in the bin.
Plan b came to me as I was scouring around looking for suitable fencing materials. My eagle eyes settled on Mr TGs quicklock scaffolding, well he has plenty of it so I figured he wouldn't miss what I needed. Problem was how was I going to secure the scaffold panel to the ground because a) I couldn't be bothered with hammering stakes into the ground b) I didn't have any stakes less than 9ft anyways and c) this thing is supposed to be temporary (well it's now definitely gonna be that cos one wind will probably take this thing down).
I finally decided to hammer the legs of each panel into the ground - cool huh! With that done I sat back and looked at my new fencing and realised two things a) The fencing was now so low that the Great Dane could easily step over it and b) the height didn't matter because the dogs could get through the gaps in the panel anyway.
See, this is what happens when you don't plan Linda!
Next brainwave should have been to take it all down and forget it but no, not me, I stick pallets in front of it instead and as if that wasn't bad enough I tied the pallets to the scaffold with bright blue twine.
This is so not what I had in mind but here is the finished disaster result

How not to make a pallet wood fence

Atrocious isn't it. I so didn't have this in mind when we decided to start landscaping the garden.
And all because these boys keep demolishing my garden and plants. Going to have to have a permanent area sorted for them soon though because we need to be landscaping the half of the garden they're now banished to. Would you believe these guys have 4 acres they can destroy other than my garden........

Atlas & Huntly, the reason my garden is a mess and now sports a naff fence.

As if the front view wasn't bad enough here's the back view and what I have the pleasure of seeing whenever I work out there

Oh the shame!

I'm hoping that Mr TG will either hate it or take pity on me and help me sort something else out because I just cannot work with that lol.

On another note, I inspected the veg beds and garden beds round at the polytunnel today and one of the first things popping through is this

Garden thug - Horsetail

Grrrrrrrrr! Blinkin Horse tail. This stuff is the bane of my life round the polytunnel area because the ground is boggy near the pond and this stuff thrives there. I have never come across such a rampant, tenacious impossible to kill weed in all my life. I could ignore it if it stuck tot he pond edges but it comes up through the veg beds, the flower beds and even in the polytunnel.
I hate this stuff!

Tuesday, 9 April 2013

Embarrassing garden plans

I was really going to do it. I was going to bite the bullet and post my garden plans that I had a go at drawing up the other day. I just can't do it. I ummed and ahhed but I honestly cannot embarrass myself that much, nor Mr TG cos his were worse (in my humble opinion).
You see I AM an artist. By that I mean I have an O Level grade A in Art and had I not followed the Equestrian route after school I may very well have attempted to eke out a living through Art.
With that in mind I just cannot bring myself ..............................oh what the heck I'll do it, but first I have to post a picture of the last thing I drew a couple of years ago because I'd rather a half decent drawing was the first thing you see


Please bear in mind that this VERY ROUGH garden plan was scribbled down with a biro on the garden and is neither to scale nor exactly finished. What I will do is re-draw it properly (still not to scale mind cos I'm too lazy to measure it all) and then re-post it but for now.....


I have never made garden plans - EVER! If it works in my head then I do it, if it looks naff when I've finished then I'll sulk for a while before re-doing it.  My expertise (or lack of) in the garden design drawing department is clearly evident in several areas.
  1. The obvious naffness of the drawing.
  2. The fact that I had to extend our boundary fence at the bottom into the farmers field (don't think the sheep would take kindly to that)
  3. Not one plant that already exists is named (or even in its correct place in the plan)
  4. Not one plant name has been suggested (because I make it up as I go along and I'll decide on those rather crucial elements 2 seconds before I plant them)
  5. No element is described i.e. Who's to know that the squiggle going all the way across the grass is a path of some description.
  6. Who's to know that it even IS grass?
  7. Again, the obvious naffness of the drawing.
Now I feel brave enough to include Mr TG's garden plan. You need to picture the scene first though:- Do you remember at school when you didn't want anyone to copy your work so you hunched over it with that protective arm circle?  Well that was Mr TG with these garden plans, so you now have to imagine the masterpiece  I was expecting with all his protectiveness


Now I appreciate how rubbish my own design is but floating grass?  When he first revealed this masterpiece it took me an age to focus on it, it really did.
At least Mr TG did offer some plant suggestions but here's why this plan is equally as naff as my own
  1. All that path that goes round the floating lawn and up to the bird aviary and off into a million other places is a stone set path - this project is mine and it would take me years to cart that much stone from acres away and set it all.
  2. The plants! Well let's just say those things that look like buried bodies are his planting suggestions.
  3. Look hard and you'll see his suggestion of "small box hedge" randomly splattered down the side of the floating lawn. Box blight and hedge cutting are not in his vocabulary.
  4. At the far top right he suggests a "Rose garden". Lovely you might say, only his Rose garden is in the most exposed North facing area of the garden. Wind would rip them apart - Oh the slaughter of it all!
  5. A water feature in the middle of the lawn? Seriously? And a round one to boot.
  6. The area that gets the most sun and heat (which we need to use here in the Highlands) is the area he's stuck a patio on with potted plants$$!!
  7. His plan makes absolutely no sense whatsoever and would do my head in every time I go out there. 
  8. It's naff!
So there you go I've embarrassed myself and Mr TG (though Mr TG will never find out) and I completely understand if you're unable to offer us some helpful hints due to the belly aching laugh you are probably in the middle of.

So I am going to leave you with a couple more arty pictures. Not mine this time, these are by one of my daughters who inherited my Arty flair. Actually they both inherited it (twins) but one of them doesn't bother so much


Once you've managed to stop laughing perhaps you could offer a helpful hint re the garden design process? Other than "Give up" or "Get someone in that can actually draw" of course because we've already heard that LOL.

Thursday, 21 March 2013

Look what can be made...

I bet many of us garden bloggers spend a fair bit of time reading other blogs of interest and/or typing some relevant search into Google and seeing what it comes up with (I seriously can't be the only one that does this.....can I).
I'm more of a visual gal so once I've typed in what I'm looking for I go straight to 'images' and check out the results that way.
There's been many times when I've seen something so awesome and yet so obvious and thought to myself 'why the heck didn't I come up with that?' and I'll often pin them to 'Pinterest' even though I hardly ever go back to look at them afterwards.

Today I just have to share some of the awesomeness I've found online and I found this idea over at 'Creative DIY Gardening'. If you live with a sloping garden I think this would be an amazing way to grow veggies - if you're not a veggie grower then just imagine it plastered with flower power

Creative DIY Gardening

How's this next one for a veggie or flower trellis from 'The stir', or even just as a garden divide as a piece of art in its own right. Easy to make with copper pipe and joins and when it's weathered it will take on a more muted  tone (though personally I would want it to stay looking this good and copperish)

'The stir'
This 'DIY garden hose hanger' is one of those obvious ones that I wish I'd thought of, however I will definitely be doing this as it's such a nice way of keeping that unsightly hose tidy. It could also have a couple of hanging baskets attached to it to make it look even prettier.

DIY garden hose hanger

I have very clear ideas of what I want in a garden (even though my garden resembles none of them) and this next image of 'Eudora Welty's backyard garden' shows it perfectly. I love this

I could spend so much time sitting there surrounded by my favourite flower - the Rose.


This next one is another project I have had on my to do list for the past couple of years - leaf castings. 'The Yarnability' made some as bird baths but whatever use you want a leaf casting for 'The Yarnability' have a very clear and concise tutorial on their web. I've planned to do Gunnera and Fatsia leaves so hopefully this year I'll actually get round to it.


Hope you enjoyed all the awesomeness.