Showing posts with label Recycled. Show all posts

Thursday, 30 April 2015

Pallet wood Adirondack chairs

My garden really is taking some neglect of late. I really should be much further along with the re-design than am I, in fact to be honest I've done nothing out there since my last post. It's not from a lack of caring though it's down to the fact that I've been super busy in the workshop building furniture for the new decking (that isn't even in place yet) and building planters for Roses.

I was super surprised the other day when my daughter came home from work with a boot full of plants that were headed for the skip, once I've sorted through them I'll post pix but I know for definite I'm  making a hedge from the amount of Viburnum Tinus I now have.

For now though I'm simply going to show you my latest project. Remember the Adirondack chairs I made last year? (or the year before - I forget), well I've made a second batch and MrTG has declared they far exceed the previous ones in both looks and comfort.
I couldn't find the exact plans I needed to make this design so I basically made it up as I went along but used inspiration from 3 seperate designs. Of course I made the footstools to match though I have since realised they don't actually match as they are angular on the ends as opposed to rounded like the chairs.


What i love most about these chairs is that they have cost me nothing more than time as all the wood is either from pallets or old stuff I have stored. All I have to do now is paint them and while I painted the last ones in 'Summer Damson' by Cuprinol I have chosed 'Fresh Rosemary' for these ones because I'm going much lighter on the new part of the garden.

Cuprinol Garden Shades 'Fresh Rosemary'
The shade is actually a mintier green than is showing above.
Here's the Adirondack chairs I made previously. A very different style as they're more angular and don't have floating arms like the new ones do.


Thursday, 29 August 2013

DIY potting bench.

I've wanted to build a potting bench for the garden for quite a while now and wasted spent many a hour scouring Google and Pinterest for ideas and plans to make the ultimate bench.
I had huge ideas for this bench - it was going to have built in bins for compost, a sink, plenty of storage and hooks for hanging "stuff", but most of all it was going to be the prettiest little potting bench this side of Caithness.

My inspiration included this bench from 'My Honeys Place'.
Love the colour, the little heart cut out and especially the sink.


Or this one from 'Homeroad'.
I love that suzy uses old gates/wood, slates on the top, has the cute drawers and the window to the side.


There are free plans available all over the tinterweb for pretty much any design of potting bench you could possibly want.
But Linda doesn't 'do' plans!
One day Linda is going to learn the concept of planning and is going to have all timber correct in size ready to hand before attempting a project that can end up being big and complex.
On this particular build though I stuck to my usual 'make it up as I go along' method and lets just say I had many moments of seriously hating the project and it came veeeeery close to being dumped on Mr TGs burning heap (if I could have carried the beast that is).
The end result is not particularly pleasing to the eye, it has none of the special compartments I wanted, only has one shelf (which is already home to a Hosta rather than the compost and pots it was made for) and is made from so many odds and sods of scrapwood that it could never look very well put together BUT it does the job.....just!


Ultimately it is not long enough which is why I had to add to a side tray and I suspect I'm still going to end up using the patio table as a potting bench rather than this.
I did have one groovy idea though - I was worried that after a few uses the bench part of it was going to look seriously grotty and dirty from compost and I know I'd be forever painting over it, then I remembered that somewhere I had a bottle of Crystal resin (see where this is going). The resin was a fair few years old (I'm guessing at least 8) so I didn't know if it would work but I thought if I could coat the top with resin then it would make it wipeable.
I have to admit the resin did look a bit dodgy and had actually crystalised in parts but I mixed it all with the hardener and just spread the stuff. It took a good 2 days to harden but harden it has and I now have that wipeable surface.

I also built this planter for a standard Rose that I bought from Homebase. The Rose looks a tad dodgy as it was on the reduced isle (last step before the skip) and it doesn't look a pretty sight at the moment but at least it has a pretty planter.
I made the whole thing from scrapwood (of course) and made it up as I went along (of course), lined it with large dog food bags (wish I'd used compost bags as at least they'd be black) and coated it with Cuprinol Garden shades 'Summer Damson'


Tuesday, 30 July 2013

Garden projects and another plant ID

Yesterday was my first  day of doing anything resembling 'real' gardening since popping a disc in my back, I'm not fully recovered but I think I did pretty darned well to hold back for 3 weeks so I thought 'why not give it a go'.
I'll admit I could have started with something less taxing on the back than shifting slabs and heavy pots (I never learn) and yes my back is sore today but I don't care, I had a blast!

It took me pretty much all day to complete 2 small jobs but hey ho I got there in the end. The first job was to replace this scaffold board walkway at the pond with something a tad better looking, obviously this involved plentiful weeding too but it's certainly improved it.
This is the before  (look at all those weeds - eek!)


And after - excuse all the mud/stone/weed right at the back, that whole area is going to be decked ........ eventually!


Next job was to pot up a climbing Fuchsia 'Mrs Boothby' and provide some kind of trellis for her to cling to. Originally I came up with this first trellis simply because it was lightweight and meant less bending etc for me


but I thought it look blah and that the Fuchsia would soon outgrown the trellis so I changed it. Whatever I put there has to be moveable until Mr TG has finished the Harling to the external walls and all I could find big enough and moveable was this


At first I liked it but the more I looked at it the less I liked the colour, the creamy first one looked much better against the wall and suited the plant better so I'm either going to spray this one ream (it's a metal bed frame incidentally) or I'm going to build a brand new one and paint it the cream I use all over the garden - 'Cuprinol garden shades - Old stone (I think)'.
I've hankered after a climbing Fuchsia for a while and I love it, obviously it will need protecting in the winter so will go in the poly tunnel but I can't wait to see how it performs next year - I may even attempt cuttings.

I have this lovely yellow plant flowering in the garden this year. I remember planting it last year but assumed it had died over winter, for the life of me I cannot remember the name of it - any ideas? I think it began with an 'S' but I could be wrong.


I'm supposed to be taking it easy today, supposed to be making a start on Christmas cards and I was happy to do that when the weather man claimed we'd have rain all day today, but there's no sign of rain and I want to make an outdoor potting bench - what to do, what to do!

Tuesday, 28 May 2013

Birds, flowers and Pergolas

Despite the wind today I got the pergola finished. I didn't get the trellis up as well though because I came across a problem that could see me damaging a pipe that I would really rather not damage, so I'm going to have to think it through first.
Here's the finished pergola though


I'm not sure what to do with the sides yet (if anything), I'll make a decision once the trellis is up.

Remember those Bamboo plants that my daughter saved for me from work, the ones that were in the skip? The ones that were about 15ft tall and we had to transport them home in a car? Well it seems that not even Homebase can kill Golden bamboo - a bit of repotting, feed, lots of water and some TLC and they're paying me back


I'm so pleased they survived even though they looked just about had it, I now have £120.00 worth of bamboo for free.

I've never grown Verbena but I picked up 3 plants on sale at a garden centre earlier in the year. The 3 plants are still in pots and growing well but a week ago I thought I'd snip the tops off, bung them in some compost and put them in the heated propagator.
I'm not the best cutting taker and 99% of what I cut usually dies but lookit


Only a week old and they're shooting up. Think I'm going to take some more!

Finally can anyone name this plant, I got it from my mums old garden and left it in a pot just to see what it does. I'd love to know what it is.


Oh, one more thing. After 3 years absence look what has come back to the new feeding station in my garden


Siskins - I think!

Sharing this post over at

Creative Home Expressions 
Three Mango Seeds
DIY Showoff 

Monday, 27 May 2013

Tantrums and pergolas

I really wasn't looking forward to tackling the pergola again yesterday, in fact I headed straight for the polytunnel and decided I wasn't going to bother - it was the thought of taking apart the work I'd already done for the sake of the 1/2" I was out in measurements.
By the the time I'd finished in the PT though I decided I may as well give it a go, well you can imagine how well it went with a 'give it a go' attitude can't you.
I re-measured and re-measured, took everything apart and re-built to my exact new measurements - nothing could go wrong!
I began erecting the structure and despite bracing the darned thing with battens I could not get the structure square - one side kept pulling the other side out and vice versa.
Mr TG who decided to go to work yesterday due to the nice weather (he's been rained off alot lately) received some very choice texts along the lines of

"This stupid $%£*ing pergola will not square up"  followed shortly by
"I don't want a pergola anymore"

By this time I had had a right royal tantrum and was kicking grass and throwing tools. Only the night before Mr TG had reminded me sarcastically what I say to him in his fits of "Bo$$ox to the whole thing". "Remember what you tell me" says Mr TG "there's no point having a childish tantrum just walk away and leave it"
Well Mr TG I offer advice all the time doesn't mean I follow it!

Anyway I did take a deep breath and figured I'd get the top permanent braces cut, fix them and see from there.
Suddenly it all took shape, the top braces fixed the sides at the correct spacings and once I'd finally managed to get the sides spirit level straight I fixed em toot sweet with 6" nails.
I'd hoped to get it completely finished but I was starting to make silly mistakes on the top cross sections and wasted 2 lengths of wood so I called it a day.
Here's where it's at at the moment


All built from scrap wood which makes it all the more pleasing and I'm so glad I stuck at it now.
Mr TG was most impressed when he got home cos he thought he was going to see a new pile of firewood - O ye of little faith Mr TG - I call myself tenacious for a reason.

Saturday, 27 April 2013

Manure and worms, what could be better!

I have decided to stop whinging about the weather! I've come to the conclusion that it is what it is, I have no control over it so  I just need to work with it.
What made me come to that conclusion? Well, yet again today I watched the weather forecast on TV and planned my day accordingly. It wasn't supposed to be terribly warm today but we were assured of a dry day with a little breeze, this means conditions would be perfect for me to get out and dig some more of that clay soil over after last nights downpour. With the washing loaded onto the line outside I donned the boots and got ready. As soon as I got outside the heavens opened and we got hit with hail stones! I sheltered in the greenhouse and fed the birds while I waited for it to pass and waited and waited and waited. Looks like today is cold, windy and chucking hail stones at us - I give up caring!

Anyways yesterday (another day similar to today) I got my daughter out of her pit at 6am to come running with me (didn't go down too well) and after our brisk exercise I roped her into coming with me to get a trailer load of manure - yes, I finally get some of those worms.


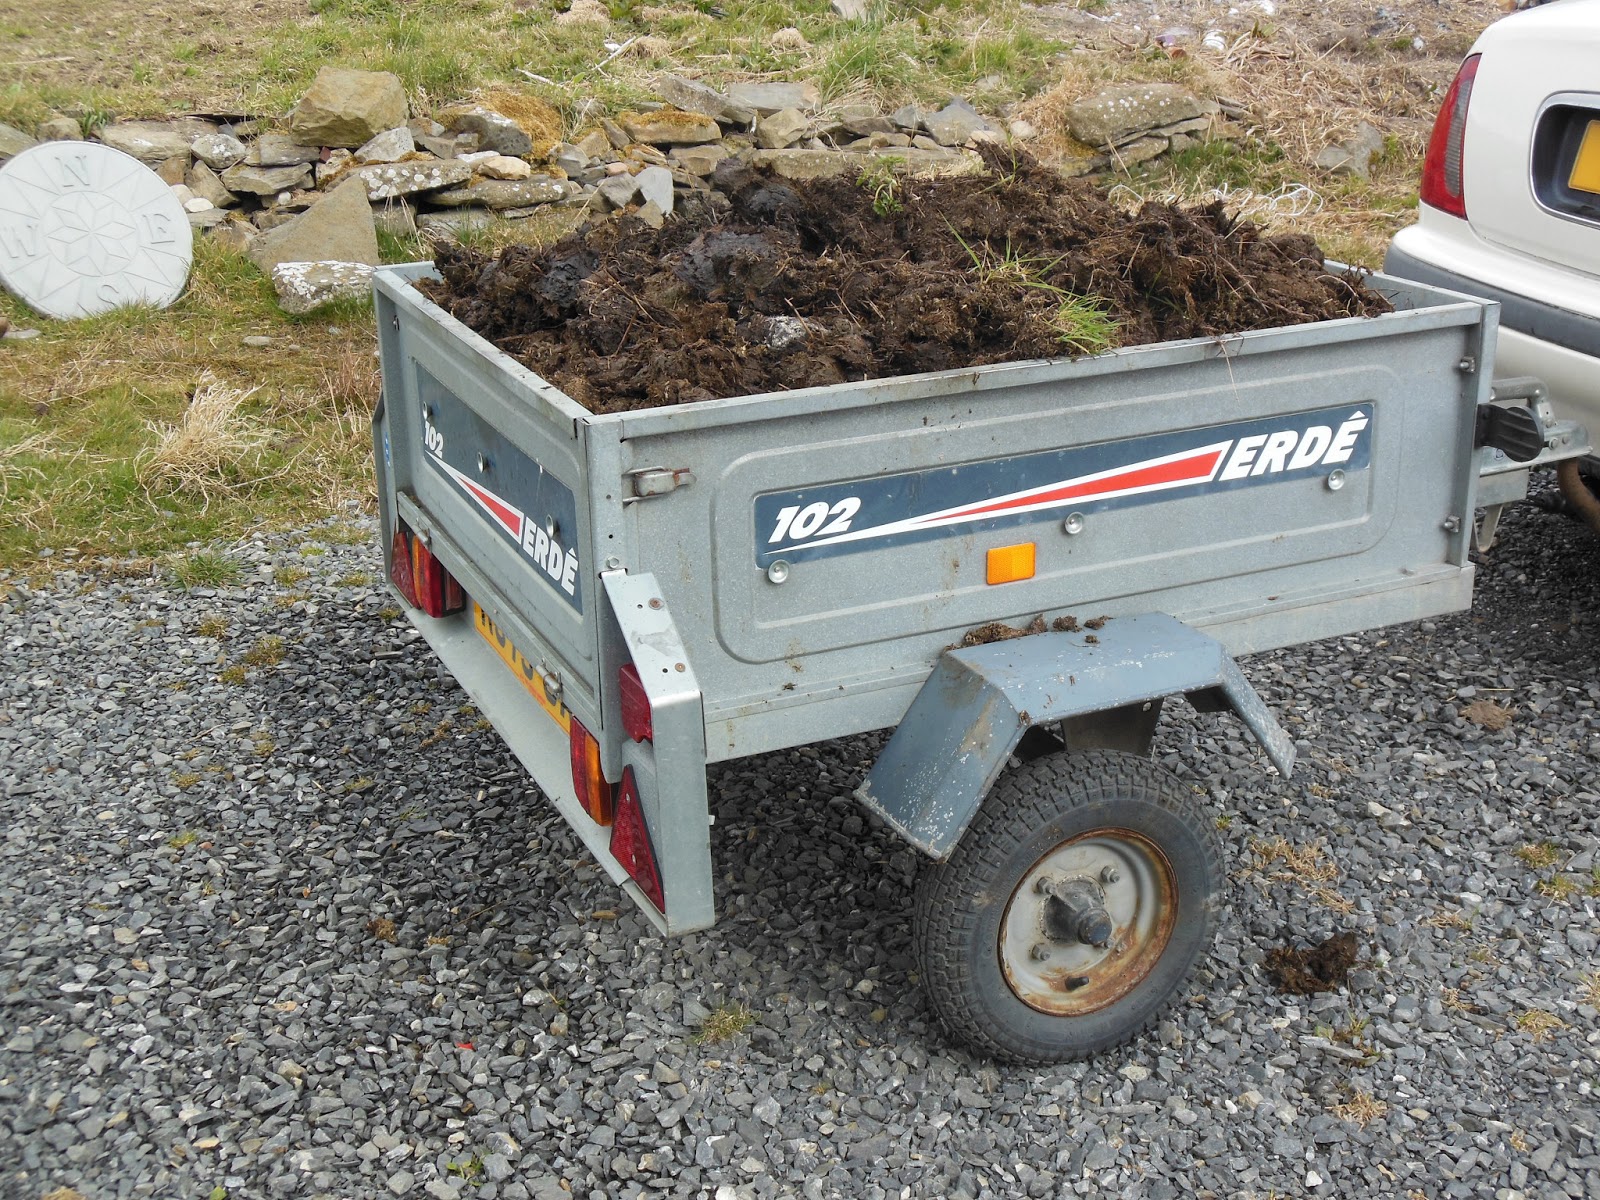
One trailer load of that went nowhere so today Mr TG roped in my daughter and her boyfriend (at 7am lmao) and we took his 14ft trailer and filled it to the gunnels with manure, should be enough for quite a while and as an added surprise I'm pulling out all sorts of bulbs from it at the moment, mainly Daffs and Tulips but it's gonna be exciting to see them next year.
The manure is extremely well rotted as it's been in a heap for a few years so I delved in with gloved hands and started pulling out those worms. To be honest I haven't a clue what makes one worm different from another but apparently the common garden worm is no good because it can't stand the conditions of a wormery - I needed specific worms. So assuming the worms found in that muck are the correct worms I got my wormery going.
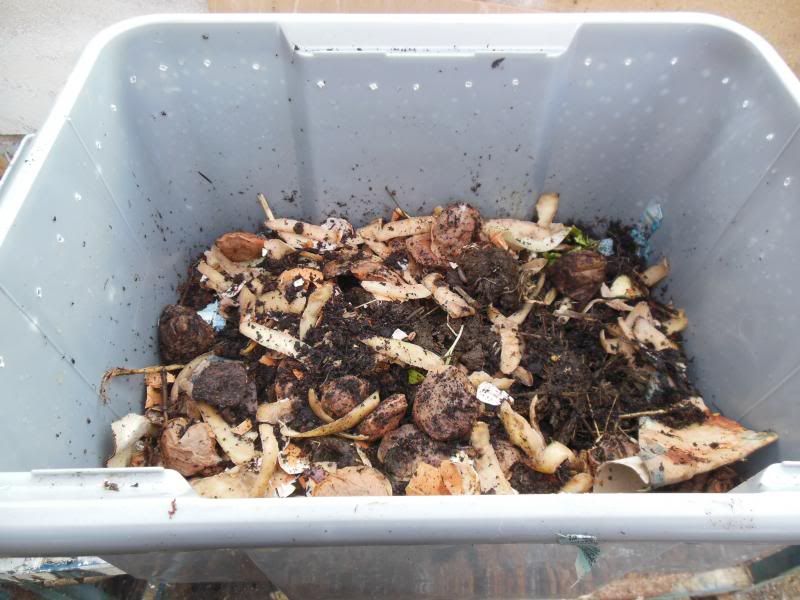
I've read many wormery articles on the net and all the different advice got mushed up in my already mushed up brain so I figured I'll do what I think is right and I'll soon learn if it's not. With that in mind I lay damp cardboard on the bottom of the middle bin, added damp shredded paper followed by a little garden compost then the worms then some kitchen scraps and finally damp cardboard to keep the little critters underneath and working away all topped off with the lid.
Here's the inside before the cardboard top layer


I'll let you know how it goes.

Onto a more exciting note the Silkie hen is sitting on eggs for the first time this year. Silkies make fabulous brooders and it's all this one seems to want to do. We've had a few chicks hatch but because we've left the rearing to the hen only 2 have survived past a few days old and even those 2 came close to death once. This time we'll let her sit on them and hatch them but then we'll take them and rear them.
Silkies really don't have much interest to me because they're more a pretty bird than anything else and their eggs are pretty pathetic, but we'll sell the chicks once they're old enough and then next time she gets broody I'm going to swap her eggs for some of the laying hens eggs and see if she's successful at hatching them. Granted the chicks will have a Silkie father but I'm hoping that's as far as the resemblance goes - I have no idea about these things.


She will not move off those eggs for anything!


Friday, 19 April 2013

A....erm....pallet wood monstrosity.....

Today I built the perfect example of everything Mr TG hates and loathes about a DIYer getting their mitts on pallets - the pallet fence!
I hear your cries that pallets make excellent fencing and I myself agree, however NOT the way I built one.
I'm not the most patient of people I'll admit and as I often say I don't work from a plan either so alot of my projects are doomed from the start. However I had put a little thought into this one, well as far as deciding what I was going to make the fence with anyway, the fact that I didn't have anywhere near enough windbreak netting put plan a in the bin.
Plan b came to me as I was scouring around looking for suitable fencing materials. My eagle eyes settled on Mr TGs quicklock scaffolding, well he has plenty of it so I figured he wouldn't miss what I needed. Problem was how was I going to secure the scaffold panel to the ground because a) I couldn't be bothered with hammering stakes into the ground b) I didn't have any stakes less than 9ft anyways and c) this thing is supposed to be temporary (well it's now definitely gonna be that cos one wind will probably take this thing down).
I finally decided to hammer the legs of each panel into the ground - cool huh! With that done I sat back and looked at my new fencing and realised two things a) The fencing was now so low that the Great Dane could easily step over it and b) the height didn't matter because the dogs could get through the gaps in the panel anyway.
See, this is what happens when you don't plan Linda!
Next brainwave should have been to take it all down and forget it but no, not me, I stick pallets in front of it instead and as if that wasn't bad enough I tied the pallets to the scaffold with bright blue twine.
This is so not what I had in mind but here is the finished disaster result

How not to make a pallet wood fence

Atrocious isn't it. I so didn't have this in mind when we decided to start landscaping the garden.
And all because these boys keep demolishing my garden and plants. Going to have to have a permanent area sorted for them soon though because we need to be landscaping the half of the garden they're now banished to. Would you believe these guys have 4 acres they can destroy other than my garden........

Atlas & Huntly, the reason my garden is a mess and now sports a naff fence.

As if the front view wasn't bad enough here's the back view and what I have the pleasure of seeing whenever I work out there

Oh the shame!

I'm hoping that Mr TG will either hate it or take pity on me and help me sort something else out because I just cannot work with that lol.

On another note, I inspected the veg beds and garden beds round at the polytunnel today and one of the first things popping through is this

Garden thug - Horsetail

Grrrrrrrrr! Blinkin Horse tail. This stuff is the bane of my life round the polytunnel area because the ground is boggy near the pond and this stuff thrives there. I have never come across such a rampant, tenacious impossible to kill weed in all my life. I could ignore it if it stuck tot he pond edges but it comes up through the veg beds, the flower beds and even in the polytunnel.
I hate this stuff!

Tuesday, 16 April 2013

The Bees are finally buzzing...at least one is anyway!

I had the best surprise ever when I went into the Polytunnel yesterday - a Bee! But not just any Bee, this is the first Bee I have seen this year and I have a Pear tree and a Plum tree in there that could seriously do with some pollinating.
Shame the little guy took off from this position though and proceeded to buzz around the plastic


This is where I need the little guy to be

I did try hand pollinating as all my fruit trees are self fertile but I don't think I did a good job of it - much better if Mr Bee does it.

I also managed to get some of the veggies pricked out and potted up individually. It's going to be a fair few weeks before it's safe to plant these guys out though


The original Sweetcorn that I sowed died. I thought I may have been able to save them but it wasn't to be and luckily I made another sowing just in case they didn't make it, so thankfully I have more Sweetcorn on its way.
I have plenty of Cabbage (Greyhound & Golden Acre) and Cauli (All the year round) for the first sowing, I'll make another sowing in a few weeks.
The Tomatoes (Roma, Black Russian & Gardeners delight) all seem to be doing well. The Swede (Invitation), Cucumbers and Courgettes (I must post the varieties) are all romping away in the polytunnel.
I've got French beans growing too but they won't be able to go out for a few weeks neither will the Leeks.
The ground is still quite cold at the moment so I am going to have cover it with plastic to warm it up a bit so that I can get the Parsnips in.
So far I have had absolutely no success with the Celeriac sowings. I've done two seperate sowings and tried one in the heated propagator and one in the polytunnel. The propagator ones grew sporadically then just withered away and the polytunnel ones have yet to show any life at all.

And because all the veggies are growing I needed to make some more veg markers. I didn't want to make completely wooden ones for the veggies though because I needed something that would be quick to make and require nothing more than cutting and nailing, plus I wanted whatever I wrote the veggie name on to be weather proof so here's what I came up with


Granted they're not the most stunning of markers but they were quick, easy and free to make. All I did was cut that wood to the length I wanted, cut up an old milk carton to get the plastic I wanted then folded the plastic over on top and nailed it to the wood


I'll make the more ornamental ones I posted about HERE for the garden plants or plants that are in tubs.

Thursday, 11 April 2013

My DIY wormery

The bitingly cold weather appears to be hanging on here and it doesn't make for a happy gardening experience so yesterday I figured I'd spend the day clearing up jobs in the greenhouse and polytunnel.
Once I got in there though I suddenly had a whim to build a wormery. I've wanted to build a wormery for a while just to see if it composts down those kitchen scraps quicker than my compost heap but it had to be made using items I could salvage from around here (not buying a thing).
I didn't have the tubs I wanted to use last time so gave up on the project, however I now have a surplus of those plastic tubs so I gathered 3 of them and 1 lid and headed off to the greenhouse / workshop.


I decided I wanted the lid to be black instead of clear to absorb a bit of heat in the winter so I gave it a coat of black paint I bought for the indoor log burner.

diy wormery, plastic tub wormery, budget wormery


Next I had to adapt the bottom bin which would be the one used to collect the liquid from the wormy compost. Alot of the tutorials online suggested placing a brick or two in the bottom so that the next tub wouldn't sit all the way down and the liquid end up drowning the poor worms but even if I did own a brick or two, which I don't (have never even seen a brick here in the Highlands) it's not what I wanted to do.
So I decided in my wisdom to screw a square block to two of the internal sides so that the next tub could sit on those - like this

 budget wormery, handmade wormery, DIY project, garden project


I did then realise (when I took the time to actually think the process through) that in my "wisdom" I had actually made the liquid tub no longer watertight - duh!
Oh well, I'll just have to empty it regularly won't I!
As for the actual reality of screwing those blocks on, well let's just say I could have kicked the whole thing over the valley because I made a real meal of it. The main problem being that I wouldn't even allow a 1/4" difference between the two because if both sides didn't sit level it would bug the hell out of me.
With the bottom liquid catching tub done I moved on to the next level. This next tub needed teeny tiny holes drilling in the base to allow all the liquid to drip through to the bottom tub (I'm kinda going on blind faith that the worms won't follow suit) and then I drilled air holes all the way around the top of the tub

 DIY wormery, garden project, garden compost, plastic tub wormery


This second tub then sat niftily on top of those blocks in the bottom tub

 DIY wormery, Garden project, budget wormery


The final top tub then had the same air holes drilled around the top and holes drilled in the base so that the worms can move on up as they need to.

 DIY wormery, budget wormery, plastic tub wormery


With the lid on all I needed to do was add the ingredients and the all important worms.
Research told me that I needed to first put some damp cardboard on the base of the middle tub (hopefully this is designed to stop them pesky worms dropping to their watery death below) followed by some damp shredded paper, then some soil with the worms and finally some kitchen waste.
Once all the layers are in place I then simply put more damp cardboard on top of it all and then stack the third tub (with the lid on top) and then wait for those worms to do their thing!
So, where do I get the worms? I remember when I last got a load of horse manure that it was full of the correct Brandling worms but I've not got any recent manure so what to do? Well apparantly the compost heap is very likely to have some so I donned my Marigolds and plunged my hands into the compost heap.
After 10 minutes of rooting I found nothing! Nada! Not only was there no Brandling worms but there were no worms whatsoever - that can't be good can it?
So my newly built wormery is just sitting there because I refuse to buy blinkin worms. I'm just going to have to go and get a trailer load of manure.
Buying worms!!!! Whoever would think of such a thing! Worms!!!!

Saturday, 6 April 2013

DIY Plant supports

It's been a strange day today weather wise. Yesterday was probably the warmest day so far this year and then today we were working away amid snow flurries - yet it didn't actually feel that cold.
Much has been done outside though and despite me promising myself not to I'm still milling about from garden to greenhouse to polytunnel, but at least jobs are getting done.
Have to say though when we get gorgeous days it is kinda difficult to not stop and stare every few minutes at the scenery around us. This field will be full of Spring lambs soon but we are very close to the sea and unfortunately I have always found the Ocean to be mesmerising


I had an idea the other day, one of those ideas that blindsides you at 4am. I'd been thinking about making some plant supports for some of my garden flowers (thinking waaaaaay ahead here) and I've always found bamboo canes to be the best and most resilient supports but let's face it - dey ugly man! Plus I always have this vision of me falling on the end and skewering an eyeball or one of the dogs getting impaled on them so I needed some end caps that wouldn't cost anything (totally hate buying what can be made). I have hundreds of wine corks (I'm not a drinker they were donated, I honestly haven't gotten through hundreds of bottles of wine - honest) but lets face it they're about as appealing as the bamboo canes - stick a boring wine cork on top of a boring cane and what do you have ...... boring plant supports.
So that 4am idea that woke me up (It honestly did happen like that too ) was to spray the canes with whatever spray I already have and then paint the wine corks with nail varnish.
For ages I'd been contemplating what to paint the corks with because it had to be durable and weather resistant so Nail varnish made complete sense ......... at 4am.
Armed with canes, silver sparkle spray and various colours of nail varnish I headed to the greenhouse / workshop and put my funky plan into action. Here are various colours waiting for approval (or not as the case turned out to be)


The best colour by far was the bottom greeny one, it looked quite fabulous against the silver of the cane. The Pink one just looked too washed out and was discarded. At this point I've only used the greeny one, the navy blue and the deep red (top left that looks black) plus some gold ones as I found an old can of Xmas gold spray.


I've made quite a few now and at the moment they're keeping the dogs off areas of my garden borders that have been planted up. I had to resort to all kinds of deterrant measures because Huntly the little ........ erm... fecking horror sweetie is determined to dig up every plant I plant and thinks that all the new soil I barrowed over from what seems like 3 miles away is there for him to dig straight back out again. I seriously cannot wait until we have another area for the dogs to play in.

I also decided to finally get round to moving Mahonia 'Winter Sun' to another location. It's been situated under a tree for about 9 years now and has never flourished or flowered. I've been meaning to move it for ages and as the whole area is going to get an overhaul this year (hopefully)  I figured now was a pretty good time to do it


See how cruddy the ground is. I had a fab idea years ago to polythene the ground and gravel it on top cos that would stop weeds right? Nope, not so much. Seems weeds grow in gravel and can puncture thick polythene in the bid to wage war on my garden.
When it's been completely renovated all the gravel will be gone and there'll be fresh soil with bark chippings on top in its place.
Anyway that's where the sickly Mahonia lived and now it lives here

Mahonia 'Winter sun'.

That's its new home with lots more sunshine (I previously believed they needed heavy shade) plus a good prune to encourage it to bush out a little. Now we just wait and see if it responds the way I hope it will.

I'm sharing this at

Tillys Nest 
Savvy Southern Style 
504 Main 
The Thrifty Grove
Common Ground 

Saturday, 30 March 2013

What have I started

That's exactly what I was asking screaming at myself this morning.
You see yesterday I decided on a whim that it was the day I was going to build my 3 bay compost area. Originally I was going to build it on a fresh area of land next to the polytunnel but I didnt think I would have all the materials I would have needed to do that and so because I am the sort of person who wants what I want when I want it, I started looking around at what I could adapt to fit.
At first I figured I shouldn't dismantle the plant pot holder I made a few years back out of old pallets


but then I figured 'what the heck', I didn't use it that much last year and anyways it just encourages me to keep stuff in small pots for too long plus the current plastic compost bin is in a bay directly to the right of the pallet pot holder.
So I ripped the whole thing apart!
Well it seemed like a good idea at the time and when I went in last night with an unfinished project on my mind I was quite oblivious as to how awkward the project would prove to be. It wouldn't have been at all awkward if I'd just started the darned thing from scratch but the way I was doing it (making it up as I go along) meant alot of hand sawing and attempting to make the whole thing at least look level (no spirit level was involved - too much hassle when I just want a job 'done').
When I eagerly walked over this morning to continue the job this is what I was faced with


That is so not how I remember leaving it last night.
After alot of jaw gaping and confusion I set to work to get the entire thing finished today. The  thing that makes my projects so unpredictable and messy is that I never ever EVER work from a plan, not even in my head in this instance. I literally made the whole thing up as I went along and finding materials to fit the mess I had created was getting a bit annoying, it has to be said.
Eventually (when I left it this afternoon) it looked like this


It's not finished. I still need to add wooden slats to the two end pallets to keep the compost in (I only got round to doing the middle bay) and I need two more decent pallets for gates but it'll do the job.
Now I'm hoping I can finally get some decent compost going because the stuff I've been making over the last couple of years is pretty naff.
I had a plastic bin in that right hand bay and I emptied it all into the middle bay but after being in the plastic bin for approx 18 months this is what it looked like


Seriously slow at rotting down and absolutely no heat.
I'm hoping the bigger bays combined with better chopping up of materials will get me some of the good stuff. I haven't made lids for the bays so I'm going to keep an eye on them and cover with polythene if I think they need it.


Thursday, 21 March 2013

Look what can be made...

I bet many of us garden bloggers spend a fair bit of time reading other blogs of interest and/or typing some relevant search into Google and seeing what it comes up with (I seriously can't be the only one that does this.....can I).
I'm more of a visual gal so once I've typed in what I'm looking for I go straight to 'images' and check out the results that way.
There's been many times when I've seen something so awesome and yet so obvious and thought to myself 'why the heck didn't I come up with that?' and I'll often pin them to 'Pinterest' even though I hardly ever go back to look at them afterwards.

Today I just have to share some of the awesomeness I've found online and I found this idea over at 'Creative DIY Gardening'. If you live with a sloping garden I think this would be an amazing way to grow veggies - if you're not a veggie grower then just imagine it plastered with flower power

Creative DIY Gardening

How's this next one for a veggie or flower trellis from 'The stir', or even just as a garden divide as a piece of art in its own right. Easy to make with copper pipe and joins and when it's weathered it will take on a more muted  tone (though personally I would want it to stay looking this good and copperish)

'The stir'
This 'DIY garden hose hanger' is one of those obvious ones that I wish I'd thought of, however I will definitely be doing this as it's such a nice way of keeping that unsightly hose tidy. It could also have a couple of hanging baskets attached to it to make it look even prettier.

DIY garden hose hanger

I have very clear ideas of what I want in a garden (even though my garden resembles none of them) and this next image of 'Eudora Welty's backyard garden' shows it perfectly. I love this

I could spend so much time sitting there surrounded by my favourite flower - the Rose.


This next one is another project I have had on my to do list for the past couple of years - leaf castings. 'The Yarnability' made some as bird baths but whatever use you want a leaf casting for 'The Yarnability' have a very clear and concise tutorial on their web. I've planned to do Gunnera and Fatsia leaves so hopefully this year I'll actually get round to it.


Hope you enjoyed all the awesomeness.